good Masonry Wall Construction Practices
- The first course of masonry shall be laid with great care, making sure that it is properly aligned, Leveled and plumbed, as this will assist the mason in laying succeeding courses to obtain a straight and truly vertical wall.
- Masonry work in a structure should be carried out in uniform height at all parts of the building to avert differential settlement of foundation due to differential loading. This shall avoid the cracking of masonry walls and also other structural elements.
- In the height of masonry in different parts of a building should not be more than 1m any time during construction.
- Masonry walls cannot be constructed to an unlimited height, most are considered stable only to a height of 10-15 ft (3 – 4m). To construct a masonry wall higher than that, need to design a special wall that has intermediate structural members to support the wall.
- Masonry works on any RCC elements should not be started till minimum of 4 weeks after striking off the shuttering.
- Masonry work should be properly cured for a minimum period of 7 to 10 days.
- Masonry wall should not be build more than 3-4 ft (1- 1.2m) in a day.
- Mortar bed thickness should be kept minimum (12 – 15 mm only) and should be uniform
- Half brick wall (100mm) to have RCC band every 1m interval.
- RCC element to be hacked and dash coat of cement mortar to be applied on it before initiating masonry wall erection this will lead to better bonding and there will be no gap between masonry wall RCC elements.
- Raking of joint to be done for better bonding of plaster on them.
How to avoid Cracks in Brick / Block Wall:
1. Masonry bricks/blocks should be embedded with a mortar which is relatively weaker than the mix used for making blocks in order to avoid the formation of cracks. A rich mortar (strong) tends to make a wall too inflexible thus limiting the effects of minor movements due to temperature and moisture variations resulting in cracking of the bricks/blocks.
2. In the case of framed RCC structure, erection of masonry walls shall be delayed wherever possible until the frame has taken up as much as possible any deformation occurring due to structural loads. If masonry walls are erected as soon as striking of formwork is done the same will lead to cracks. Masonry wall construction should start only after 02 week of formwork removal of slab.
3.Masonry wall generally adjoins column and touches beam bottom, as brick/blocks and RCC are dissimilar material they expand and contract differently these differential expansion and contraction lead to separation crack , the joint should be reinforced with chicken mesh (PVC) overlapping 50 mm both on masonry and RCC member before plastering.
4. A ceiling above a masonry wall may deflect under loads applied after its erection, or through thermal or other movements. The wall should be separated from the ceiling by a gap which shall be filled with a irrepressible material (non- shrink grouts) to avoid cracking, as a result of such deflection.
Where this cannot be done, the risk of cracking, in the case of plastered surfaces, may be reduced to some degree by reinforcement of the joint between the ceiling and the wall using chicken mesh (PVC) or by creating a cut between the ceiling plaster and the wall plaster.
5. The floor upon which a wall is built may deflect under load brought upon it after it is built. Where such deflections incline to create non-continuous bearing, the wall shall be robust enough to extent between the points of least floor deflection or shall be capable of adapting itself to the changed conditions of support without cracking. This may be achieved by embedding horizontal reinforcement such as 6 mm diameter at every alternate course of bricks.
Do's & dont's - Masonry Wall
What to Do - Masonry Wall
- The individual units shall be stored in such a way as to avoid any contact with moisture on the site. They shall be stocked on planks or other provisions free from contact with the ground and protected against wetting.
- Spread the mortar bed joints to a uniform thickness with fresh mortar.
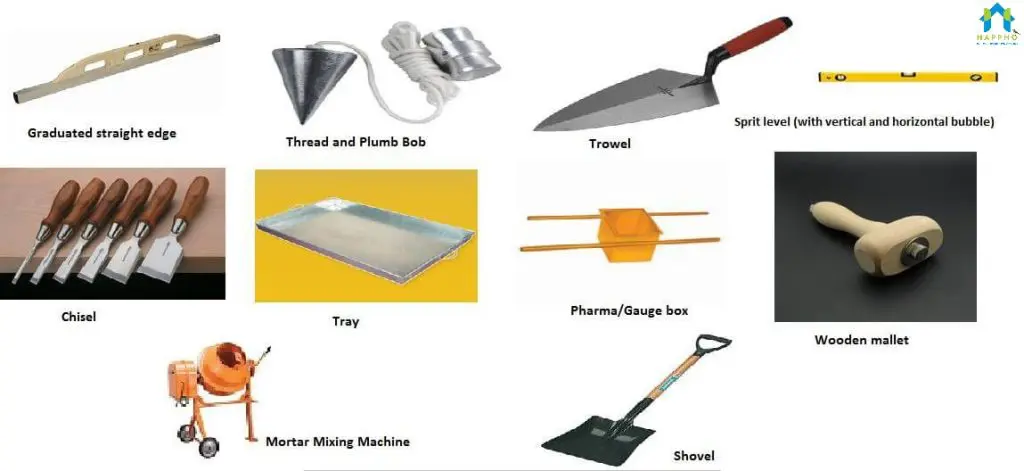
- Prepare mortar quantity which can be consumed within 30 minutes, preferably in a mortar mixer or alternatively use clean tray and shovels for mixing.
- Lay masonry units in stretcher bond when no bond pattern is indicated on the drawings.
- Adhere to control heights shown on the drawings throughout the building.
- Lay masonry units in plumb, true to line, and with accurately spaced level courses.
- Use masonry saw to cut units when required.
- Saw cut brick/block units to fit around frames, ducts, pipe chases and other construction, and fill the gaps between masonry and door frames or other built-in items sturdily with grout or mortar.
- Lay masonry units with full mortar coverage on horizontal and vertical face, thickness not more than 12 – 15 mm.
What Not to Do - Masonry Wall
- Don’t: Throw away mortar scrapings or slushing mortar into joints.
- Don’t: Allow joint dimensions to be less than neither 8 mm nor more than 15mm.
- Don’t: allow vertical joints to fall on the centerline of the unit below, always have staggered joints.
- Don’t: Install broken or cracked units.
- Don’t: Adjust any block/brick after the mortar starts to set up. Remove any unit that has been bothered after mortar has hardened and re-lay using fresh mortar only.
- Don’t: Allow more than 15mm in 10 ‘ maximum variation from plumb in vertical lines and surfaces, nor more than 5mm maximum variation in each course.
- Don’t: Allow loose mortar and grout to remain on exposed surfaces of set masonry. Clean all surfaces prior to laying fresh masonry whenever starting or resuming work.
Quality Control Checklist for brick and block work
You can download a detailed checklist from this link Brickwork Checklist
Tools for Masonry Work


